Typography - Task 1: Exercises
Week 01 – Week 05
MOO RENEE / 0359595 / Bachelor of Interactive Spatial Design
Typography
Task 1 Exercises
JUMP LINK
- 1. Lecture Note
- 1.1 Lecture 01 : Introduction
- 1.2 Lecture 02 : Development
- 1.3 Lecture 03 : Typo_3_Text_Part 1
- 1.4 Lecture 04 : Typo_4_Text (Part 2)
- 1.5 Lecture 05 : Typo_2_Basic
- 1.6 Lecture 06 : Typo_5_Understanding
- 2. Assignment Instruction
1.1 Lecture 01 : Introduction to Typography, Calligraphy & Lettering
1. Typography
- Typography is crucial and important for applications, websites, and many other design-related platforms.
- It is highly recommended to make use of readings provided in the MIB or available in online books and resources.
- Typography refers to the style and appearance of printed matter. It involves the art and technique of arranging type to make written language legible, readable, and visually appealing when displayed.
- Typography is mostly used by typographers, graphic designers, animation artists, and book artists, among others.
2. Calligraphy vs. Lettering
- Calligraphy: The art of writing—involves using specific tools and strokes to write in stylized forms (e.g., Round Hand, Foundation Hand).
- Lettering: The art of drawing letters—each letter is drawn individually as part of a composition.
- In simple terms:
- Calligraphy = writing
- Lettering = drawing
3. Conventions in Typography
- Conventions are unwritten rules that guide how type is arranged and used.
- Historically, handwriting style often reflected a person’s education level or social class.
4. Typeface vs. Font
- Typeface: A family of fonts that share similar characteristics.
- Font: A specific style/weight within a typeface (e.g., bold, italic, regular).
- Typeface = Big family, and
- Fonts = Individual family members within that typeface.
Suggested Link/Website : Fonts.com (History and more about typography)
1. Early Writing Techniques
- Writing initially involved scratching into wet clay with a sharp stick or carving into stone using chisels.
- These early methods influenced the angular and straight-line nature of early letterforms.
2. Greek Contributions
- The Greeks changed the direction of writing, developing a style called "boustrophedon".
- Boustrophedon means the text alternates direction: one line is written left to right, the next right to left, and so on.
- This was an experimental phase in writing layout before left-to-right became standardized.

3. Roman Lettering Techniques
- Roman stone carvers painted letters on marble first and then carved them following the painted guides.
- This resulted in variations in stroke thickness:
- Vertical strokes were typically thinner.
- Horizontal strokes were broader at the start and finish due to the carving tools.


%20These%20are%20the%20formal%20letterforms%20seen%20in%20Roman%20monuments.%20Written%20with%20a%20brush%20or%20chisel,%20used%20primarily%20in%20inscriptions..jpg)
%20These%20are%20the%20formal%20letterforms%20seen%20in%20Roman%20monuments.%20Written%20with%20a%20brush%20or%20chisel,%20used%20primarily%20in%20inscriptions.%20(1).jpg)
1. Kerning
- Kerning refers to the automatic adjustment of space between individual letters to create visually consistent spacing.
- It is not the same as letterspacing, as kerning adjusts spacing based on letter pairs.
- It is mostly used in headlines, where letters may invade each other's space to create tighter and more aesthetically pleasing text.

2. Letterspacing
- Letterspacing refers to manually adding or removing space between letters.
- This is often used for aesthetic purposes, such as increasing legibility or emphasizing a word.
3. Tracking
- Tracking refers to the uniform addition or removal of spacing across a range of characters in a word or sentence.
- It affects the overall spacing and consistency of word appearance, not just between specific letter pairs like kerning.
- Normal Tracking / Loose Tracking:
- If tracking is too tight, words can become hard to read due to lack of separation between letters.
- If tracking is too loose, it can break the visual pattern of words and make reading more difficult.


4. Uppercase vs. Lowercase Letterspacing
- Uppercase letters are typically designed to stand alone, so extra letterspacing helps improve their presentation.
- Lowercase letters rely on the counter form (negative space between letters) to guide the flow of reading.

5. Text Formatting Types
- Flush Left
- The most natural alignment for left-to-right reading languages.
- Each line starts at the same point on the left and ends wherever the last word finishes, resulting in a ragged right edge.
- It supports easy reading flow and is widely used in books and articles.
- Centered
- Text is center-aligned, giving symmetry to both ends of each line.
- Since the starting point of each line varies, it is harder to read.
- Best suited for small amounts of text like titles, invitations, or poems.
- Flush Right
- Text is aligned to the right, resulting in a ragged left edge.
- Since we typically read from left to right, this alignment is less readable.
- However, it can be useful for captions or short annotations where alignment with nearby images or elements is important.
- Justified
- Aligns text to both the left and right margins, creating clean vertical edges.
- Achieved by adjusting word spacing (sometimes letterspacing and kerning too).
- It can cause uneven spacing between words and may require careful formatting to maintain readability.
- Used in newspapers, books, and magazines for a formal look.
%20These%20are%20the%20formal%20letterforms%20seen%20in%20Roman%20monuments.%20Written%20with%20a%20brush%20or%20chisel,%20used%20primarily%20in%20inscriptions..png)
6. Text Texture
- Typography creates visual texture based on how dense or open the text appears:
- Dark vs. light
- Thick vs. thin
- A well-designed texture helps guide the reader’s eye across the page.
7. Anatomy of a Typeface
- X-Height
- The height of lowercase letters (excluding ascenders and descenders).
- A larger x-height can increase readability, especially in small text sizes.

8. Text Leading and Line Length
- Type Size
- Should be large enough to be read comfortably at arm’s length (e.g., while holding a book in your lap).
- Leading (Line Spacing)
- Refers to the vertical space between lines of text.
- If the leading is too tight, the reader’s eyes can jump lines or lose their place.
- If it’s too loose, it can create distracting striped patterns that break reading flow.
- Line Length
- The ideal line length is 55–65 characters per line.
- Shorter lines require less leading; longer lines require more leading.
- Lines that are too short or too long impair readability.

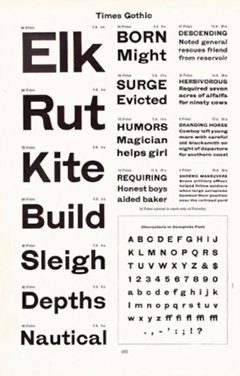
9. Type Specimen Book
- A type specimen book shows samples of typefaces in different sizes, styles, and formats.
- It provides an accurate reference for type characteristics such as:
- Typeface design
- Type size
- Leading
- Line length
- Helps designers choose the right type for a project without printing each sample individually.
Continuing from the previous lecture on text formatting and structure in typography.
1. Indicating Paragraphs
One of the historical symbols used to indicate a new paragraph is the pilcrow (¶) — a holdover from medieval manuscripts. It is rarely used in modern typesetting but still represents the concept of a paragraph break.

2. Line Space vs Leading
- Line Space: The vertical space from the baseline of one line of text to the baseline of the next.
- Leading: The space between lines of text, measured from baseline to baseline. It's named after the strips of lead used in traditional typesetting to separate lines.


Figure 1.4.2 &1.4.3 Paragraph spacing / Comparison between line spacing and leading
3. Indentation
- Standard indentation: Involves indenting the first line of a paragraph, typically equal to the point size of the text or its line spacing.
- Extended paragraphs: Creating longer paragraphs or wider columns can be visually overwhelming and reduce readability.
4. Widows and Orphans
Common formatting problems in typesetting:
- Widow: A short line left alone at the end of a column or paragraph.
- Solution: Add a forced line break before, or adjust tracking on the previous line so the last word moves down.
- Orphan: A short line left alone at the start of a new column or page.
- Solution: Adjust the length of the column to ensure no column begins with the last line of the previous paragraph.

5. Highlighting Text
When dealing with large amounts of text, highlighting can help draw attention by creating visual contrast:
- Use bold or different typefaces.
- May need to adjust font size when changing from serif to sans-serif or vice versa, due to differences in perceived size.
- To maintain alignment, avoid using all caps or oversized acronyms unless necessary.
- Can also highlight using a colored background box placed behind the text, keeping it aligned with the left reading axis.


6. Typographic Elements Outside Margins
Sometimes, placing typographic elements outside the left margin (as opposed to indenting) can help maintain a strong reading axis or create emphasis. This technique is used for visual rhythm or alignment.


7. Quotation Marks and Primes
- Proper quotation marks should be used for quotes.
- Primes (′ ″) are used for feet (′) and inches (″), not for quotation marks.


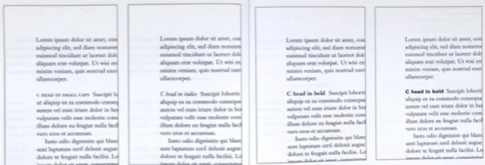
8. Headlines Within Text
Text can be divided into different sections using headline levels A, B, and C:
- "A" Headline
- Marks a clear break between sections.
- Set larger than body text, often in bold small caps.
- Typically followed by a new paragraph.

- "B" Headline
- Subordinate to "A" heads.
- Indicates a supporting argument or subtopic.
- Usually follows a forced line break, not a full paragraph space.

- "C" Headline
- Less common; used to highlight specific facts within B-head sections.
- Blends into the paragraph, shown in small caps.
- Does not interrupt the reading flow.
- Add two spaces between the C-head and the following paragraph.
9. Cross Alignment
Cross alignment occurs when highlighted text and main body text are visually aligned across the layout grid, often horizontally or vertically.
- Reinforces the architectural structure of the page.
- Enhances visual rhythm and cohesion.
- Helps readers navigate complex layouts by creating consistent reference points.

- introduced letterforms components, the font and the describing Type families.
2. The Font
Full font =A typeface family (or font family) includes multiple typefaces or styles
Uppercase and Lowercase


Small Capitals:
- Primarily found in serif fonts and often included as part of what is called an "expert set."
Uppercase / Lowercase Numerals

- These numerals are the same height as uppercase letters and are set with consistent kerning width.

- These are set to the x-height and include ascenders and descenders. They are best used when working with both uppercase and lowercase letterforms.
Italic:
- Refers back to 15th-century Italian cursive handwriting.

Punctuation and Miscellaneous Characters:
- These can vary from typeface to typeface. It’s important to ensure that all necessary characters are included in a typeface before selecting it for use.

Ornaments:
- Decorative elements used as flourishes, often found in invitations and certificates.

3. Describing Typefaces
Different typefaces have varying stroke widths and styles. Below are common classifications:
Roman
- Uppercase forms derived from inscriptions on Roman monuments.
- Variation:
- Book: A slightly lighter stroke than standard Roman.

Italic / Oblique
- Italic: Based on 15th-century Italian handwriting.
- Oblique: Similar in appearance to italic but mechanically slanted from a Roman form rather than handwritten-inspired

Boldface
- Definition: Features a thicker stroke than the Roman form.
- Variations:
- Semibold
- Medium
- Poster
- Black
- Extra Bold
- Super

Light / Thin
- Light: Lighter stroke than Roman.
- Thin: Even lighter than light.

Condense / Compressed
- Condense: A narrower version of Roman.
- Compressed: An extremely condensed style, even more narrow than Condense.

Extended
- A wider, stretched variation of a Roman form.

4. Comparing Typefaces
- Typefaces differ in:
- X-height
- Line weight
- Letterforms
- Stroke width
- Overall visual feel
- These differences:
- Influence how a typeface is perceived emotionally
- Convey specific moods or tones
- Suggest particular uses or contexts
- Examining typefaces helps us:
- Understand the feelings they evoke
- Choose typefaces that are appropriate for the message or purpose

1.6 Lecture 06 : Typo_5_Understanding
1. Letterform Structure and Expression
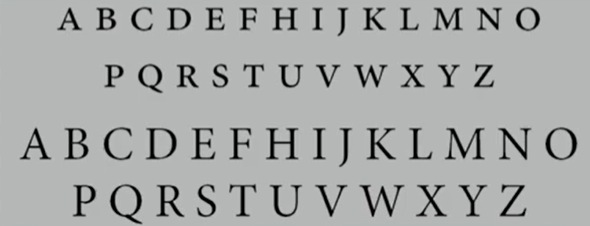
While many uppercase letterforms appear symmetrical at first glance, a closer inspection reveals subtle asymmetries that enhance both visual harmony and individual character expression.
- Baskerville (Serif Typeface):
- The contrast in stroke weight is clearly visible—thicker verticals are paired with thinner horizontals or curves, adding elegance and visual interest.
- Univers (Sans-serif Typeface):
- Though it seems uniform, a detailed look shows asymmetry in stroke width; for example, the left diagonal stroke is slightly thinner than the right, lending the typeface a refined, optical balance.


- Helvetica vs Univers – Lowercase ‘a’:
- A comparison of the lowercase 'a' in both typefaces highlights the complexity of sans-serif design. Differences are evident in how the bowl meets the stem and how terminals are finished, showcasing each typeface's unique character.

2. X-Height and Optical Adjustment
- X-height refers to the size of lowercase letters.
- Curved strokes like "s" need to extend above the median or below the baseline to appear the same size as the straight strokes they connect to.

3. Form and Counterform (Counters)
The form is the actual shape of a letter, while the counterform (or counter) refers to the space within and between letterforms.
- Internal counters are seen in letters like ‘o’, ‘b’, ‘d’, etc.
- When letters are placed together in words, the space between them also becomes a counterform.

These counterforms are just as important as the letterforms themselves, playing a crucial role in recognition and readability.
- Design Insight: Enlarging and examining individual letters helps reveal how these spaces are carefully constructed and balanced—an essential part of the letter-making process.

4. Contrast in Typography
The principle of contrast, widely used in visual design, also plays a central role in typography.
- Typography can contrast in size, weight, and shape, creating expressive and dynamic compositions.
- Examples of contrast include:
- Small + Organic vs. Large + Mechanical
- Small + Dark vs. Large + Light
These contrasts enhance the visual hierarchy and mood of a typographic layout, guiding the reader’s attention and contributing to aesthetic appeal.

1. Type Expression
- Objective: Visually express 4 given words using typography.
- Process:
- Start with sketches of ideas.
- Choose final ideas and digitize them using 10 provided typefaces.
- Show expression in both static and motion designs.
- Tools: Adobe Illustrator & Adobe Photoshop
- Goal: Communicate the meaning of each word purely through typographic treatment.
2. Text Formatting
- Preparation: Watch lectures Text: P1 and Text: P2.
- Objective:
- Learn and apply key principles of text formatting such as:
- Type choice, size, leading, line-length
- Paragraph spacing, alignment, kerning
- Managing widows & orphans, cross-alignment
- Exercises: Complete a set of incremental formatting exercises (1/4 to 4/4A).
- Final Task: Submit one A4 layout design showcasing your understanding.
- Tool: Adobe InDesign
.png)
.png)
.png)
.png)


.png)

By digitalizing the sketch in Adobe Illustrator, I mainly used the Pen Tool to add and draw elements on the text itself. I created curved visuals during the digitalization process and also tested different versions of the word to see which had the best effect. After selecting the final version, I had also made some minor adjustments to refine it.

While working on this JUMP, I explored and added shadows using different tones to create the effect of jumping off the floor. I also adjusted the shadow direction and tone to enhance the sense of movement.

The final version of “MELT” is the one on the right. However, I adjusted the letter “M” because, from a distance, it looked like a “Z.” The original version on the right also appeared too plain, so I made further refinements. The idea behind this design is to make the word look like it’s melting inside a box due to heat

For 'ROLL,' I explored various ways to spread the word from left to right and right to left. After some discussion, I decided to keep only two versions and extend them off the screen for a more dynamic effect. The idea behind this is to stretch the word 'ROLL' using lines, creating the impression that the word is forming or spinning in and out of view.

'CHILL' took more time to develop due to its curved letterforms. I experimented with several versions. My favorite was the top left design, but since it didn’t use the font provided by the lecturer, I chose the top right version. The bottom left version was originally intended to represent winter and wood, but it didn’t effectively convey the feeling of 'chill.' The other three versions was mainly the same that aim to show shivering effect to visually represent coldness.

To begin the animation in Adobe Illustrator, I selected the word “JUMP” and started experimenting with how it could be animated. Initially, my idea was to make the text transition from a straight position to a slanted one and then return to straight — mimicking the motion of a jump.
I created several versions using frame-by-frame animation, but the outcome was not very satisfying. The animation appeared slightly laggy and gave more of a “floating” effect rather than conveying a clear sense of "jumping."


.gif)
After testing these versions, I still felt the motion wasn't convincing. The animation lacked energy and did not effectively portray the "jump" action I had intended.
To improve this, I tried animating the movement of the word in a different application. I applied the jump effect I had envisioned and then exported the animation frame by frame. This animated reference served as a guide for recreating a more refined and visually accurate version in Adobe Illustrator.

.gif)
After all the testing, I created a final version of the animation with a more realistic jumping motion. Instead of slanting the text, I kept it upright to better represent the jump effect.
After receiving feedback from my lecturer, I refined the jump animation by removing two frames — one from the upward motion and one from the downward motion — to create a snappier effect. I also set the timing of two frames to “no delay,” which made the overall movement feel more energetic and less floaty, better capturing the intended dynamic of a jump.


For this exercise, one of the layouts came with detailed instructions on how it should look. These specifications included font size, kerning, paragraph spacing, and other typographic settings. Based on these guidelines, we recreated the layout sketch as accurately as possible. Below are the details provided by the lecturer:
HEAD LINE
- Typeface: Bembo Std
- Font/s: Bembo Std Bold
- Type Size/s: 72 pt
- Leading: 36 pt
- Paragraph spacing: 0
BODY
- Typeface: Bembo Std
- Font/s: Bembo Std
- Type Size/s: 9 pt
- Leading: 11 pt
- Paragraph spacing: 11 pt
- Characters per-line: 57
- Alignment: left justified
- Margins: 123 mm top, 26 mm left + right + bottom
- Columns: 2
- Gutter: 10 mm
2. Things to look out for when completing Task 1, Exercise 2 Text Formatting:
- Font size (8–12)
- Line Length (55–65/50–60 characters)
- Text Leading (2, 2.5, 3 points larger than font size)
- Paragraph spacing (follows the leading)
- Ragging (left alignment) / Rivers (Left Justification)
- Cross Alignment
- No Widows / Orphans

With the layout requirements provided by the lecturer, I began by developing eight initial layout drafts as rough sketches to explore various design ideas. These drafts were not final versions but served as a visual overview of my concepts. I presented them to the lecturer to gather feedback on which layouts were more effective and how they could be improved or refined.

The image above shows the first version of the eight layout designs created for this exercise. Based on feedback from the lecturer, I made several adjustments to improve the overall visual balance. The main suggestions included reducing empty space, repositioning images, and improving the alignment between text and images to create a more organized and visually engaging composition. Additionally, I refined the text placement to align more consistently with the subheadings.
Figure 4.1.4 The Eight layout after Adjustment (Without Grid) - 2nd Version
The revised layouts are shown in the PDFs below. Most of the updates focused on enhancing alignment, reducing visual clutter, and improving the overall layout flow. The layouts in page 7 is the ones selected by the lecturer as the final choices.
This PDF showcases the final selected layouts, with some further exploration and refinement based on the selected layout. The adjustments inside have include modifications to text wording, image sizing, font size, kerning, and the use of bold and regular font styles in Adobe InDesign to improve readability and visual hierarchy. - The lecture selected the second one (page 2) for the final


5. FEEDBACK
Week 01 & Week 02
- I did not attend any classes initially as I had not yet registered for the module. However, after joining, the lecturer advised me to watch the lecture videos and update my blog in order to catch up with what we are doing now.
Week 03 - (06/05/2025)
- Presented lecture sketches for the four words.
Feedback:
- Jump: The movement is not clearly shown.
- Melt: Looks acceptable.
- Roll and Chill: The visuals are unclear and need to be resketched.
Week 04 - (13/05/2025)
In today’s class, I showed the lecturer the digitized versions of my animated words for Task 01 Exercise 01 and asked for feedback on each version. The lecturer gave some insights on which designs worked well and which ones could be improved.
Words & Feedback:
- JUMP – Approved. The lecturer was satisfied with this version.
- CHILL – Approved. No changes needed.
- ROLL – Needs adjustment:
- The "r" could be redesigned slightly.
- Limit it to 2 elements spinning instead of 3 spinning.
- The word should shift slightly lower to the middle for better visual balance.
- MELT – Requires a small change:
- Rotate the "M" a little so it doesn’t resemble a "Z".
Week 05 - (19/05/2025)
In today's class, we worked on the 8 sketches and the final version for Exercise 02. I have also presented the animation for Exercise 01.
Specific Feedback:
- There is too much empty space.
- You can use page 7 as the final one.
- Remember to adjust the wording on all pages.
- For the animation, reduce the number of frames to make it jump more.
6.REFLECTION
6.1 Experience
Over the past five weeks, my experience in this module has been fun, interesting, and somewhat challenging. I had never used InDesign before—only heard about it—so it felt completely unfamiliar at first. Also I didn’t actually expect typography and text design to be so advanced or involve such detailed processes.
It was fascinating to learn new concepts like kerning, leading, vertical scale, and tracking—some of which I had never encountered before. Although adjusting these settings was initially challenging, especially when estimating spacing and aligning text properly, it turned out to be a great learning opportunity. Even though I only joined in Week 3, I still gained a solid introduction to the world of typography and began to appreciate its complexity and importance.
6.2 Observations
Through my observations, I found that animating and making text expressive was surprisingly enjoyable. It’s interesting how changes in layout, added elements, and text adjustments can completely transform the look and feel of a word or phrase to enhance its meaning.
That said, I found tracking particularly challenging because the changes were often subtle and difficult to see, which meant I had to repeat adjustments several times to notice the difference. The InDesign interface also felt overwhelming at times when I just started, with so many tools and options that I occasionally got lost or wasn’t sure if any changes had been applied.
On a positive note, I found the Align to Baseline Grid feature incredibly helpful. It kept my text neatly aligned to the grid line and made layout adjustments much easier.
6.3 Findings
Overall, Task 01 made me realize how detail-oriented typography really is. It demands precision and close attention to layout, letter spacing, and leading. I’ve gained a new appreciation for the effort and thought behind what might seem like simple text. Designing clean and readable layouts involves much more than just placing words—it’s a thoughtful and intentional process that brings together many different elements.
7.FURTHER READING

PDF / Source Link – [Online PDF Book Link View]
This book Fundamentals of Typography by Gavin Ambrose and Paul Harris is a comprehensive guide that explores the art and science of typography. Designed for both beginners and seasoned designers, the book have also delves into the historical evolution of type, the anatomy and classification of typefaces, and the principles of effective typographic design. at the same time it have offers practical insights into layout, hierarchy, legibility, and the use of grids, complemented by case studies and exercises that bridge theory with real-world application together. Additionally, the book have also addresses the impact of digital media on typography, discussing topics like kinetic and environmental type. that let me learned many different things in this book.

PDF / Source Link – [Online PDF Book Link View]
**Most of the content was taught in the lecture video**
A Type Primer by John Kane, is an accessible and comprehensive introduction to the fundamentals of typography. Which aimed for beginners and general readers, the book have explores the essential principles of type, including its history, anatomy, selection, and usage in design contexts.
Divided into clear chapters, the book begins with an overview of type history—from ancient writing systems to the evolution of the printing press—highlighting key developments and influential figures. It then delves into the anatomy of type, teaching readers to recognize and describe various letterform components using established typographic terminology. John Kane (the author ) have also emphasizes practical understanding, offering guidance on choosing typefaces suited to different projects and explaining how style variations (like Roman, Italic, and Condensed) affect visual communication.
Further chapters examine how typography works at the sentence and paragraph level, covering topics such as kerning, letterspacing, line length, leading, and text formatting. Readers are taught how subtle typographic choices influence readability, tone, and the overall design of a page. The book also outlines how to structure content effectively using typographic hierarchy and page elements like headers, folios, and tables of contents.


Comments
Post a Comment